A Practical Guide to Google Ads UTM Parameters
Ever wonder why leads from your expensive Google Ads campaigns just show up as 'Direct' traffic in your analytics or CRM? It's a frustratingly common problem, and it's a costly one. This data gap completely hides your true ROI, making it impossible to know which ads are actually making you money.
The fix is surprisingly straightforward: Google Ads UTM parameters. These are simple tracking codes you add to your URLs that tell you exactly where every single click came from.
Why Your Google Ads Attribution Is Broken
You're pouring thousands into a Google Ads campaign. The clicks are coming in, and new leads are appearing in your CRM. So far, so good. But when you check the lead source, it just says "Direct / None" or maybe "Organic Search."
This isn't just a minor data quirk; it's a massive blind spot that turns your marketing spend into a black box. You're left guessing which campaigns, ad groups, or keywords are actually driving revenue.
This attribution breakdown usually happens during the handoff—that moment a user clicks your ad and later submits a form on your website. Without a way for that tracking data to stick around, the original ad click information gets lost as users move around your site.
The Real-World Impact of Lost Data
Imagine you’re running Google Ads to get sign-ups for a webinar. The leads start hitting your HubSpot CRM, but half of them are tagged as 'Direct.' You have no idea where they came from.
This isn't a hypothetical nightmare. It’s a reality for 40-60% of marketers who use forms on their websites without a proper UTM setup. To really nail your campaign performance, you have to implement solid Google Ads best practices, and that starts with robust tracking.

We're not talking about small gains here. Campaigns with consistent UTM tracking achieve up to 25% higher accuracy in lead sourcing. That’s a huge improvement that directly impacts your budget and strategy.
Introducing the 5 Core UTM Parameters
So, what are these magic tags? UTM (Urchin Tracking Module) parameters are simple snippets of text you append to the end of your URL. They act like a digital passport, carrying critical attribution data with every click.
There are five standard parameters that work together to tell the full story of each visitor.
Here's a simple way to think about it: Imagine UTMs as a detailed note attached to every person who walks into your store. The note tells you they saw a specific billboard on a particular highway and were interested in a certain product. Without it, they're just another anonymous person off the street.
To help you get started, here's a quick rundown of what each of the five core parameters does.
The 5 Core Google Ads UTM Parameters Explained
This table breaks down the five standard UTMs you'll be working with. Understanding their individual roles is the first step toward building a powerful and reliable tracking system.
| Parameter | What It Tracks | Example Value |
|---|---|---|
| utm_source | The platform that sent the traffic. | google |
| utm_medium | The marketing channel. | cpc |
| utm_campaign | The specific campaign name. | spring_sale_2024 |
| utm_term | The keyword that was searched. | blue_widgets |
| utm_content | Differentiates ads within the same campaign. | video_ad_variation_a |
Mastering these five components is how you finally fix your broken attribution. They provide the raw data needed to connect your ad spend directly to real business outcomes, like leads, customers, and revenue.
Automating Your Tracking with ValueTrack Parameters
If you’re still building UTMs by hand for every single ad, you're creating a ton of unnecessary work and opening the door to costly mistakes. It's time to graduate from that tedious process and set up a scalable, automated system using Google Ads tracking templates and dynamic ValueTrack parameters.
Think of this as the "set it and forget it" approach to getting consistent, error-free attribution data.
Instead of manually typing out utm_campaign=spring_sale on every ad, you create a single template. This template uses special placeholders—ValueTrack parameters—that Google Ads automatically fills with real campaign data the moment someone clicks your ad. It dynamically inserts details like the campaign, the ad group, and even the exact keyword that got you the click.
![]()
This is hands-down the most efficient way to manage Google Ads UTM parameters at scale. It guarantees that every single click gets tagged with precise, consistent data, all without you having to lift a finger after the initial setup.
Building Your Universal Tracking Template
The smartest place to put this template is at the account level. You can find this in your Google Ads settings under "Account Settings" > "Tracking." By setting it here, you ensure it automatically applies to every campaign, ad group, and ad you ever create. No exceptions.
Here’s a powerful, ready-to-go tracking template you can copy and paste directly into that field:
{lpurl}?utm_source=google&utm_medium=cpc&utm_campaign={campaignid}&utm_content={adgroupid}&utm_term={keyword}
But just copying and pasting isn't enough; you need to know why it works. Let's break it down piece by piece.
{lpurl}: This is the most important part. It’s a placeholder for your ad's final landing page URL. Google replaces this with the correct URL, making sure the user ends up where you want them.?: This little question mark is the separator. It tells the browser, "The main URL is over, and now the tracking parameters begin."utm_source=google: We hardcode this because every click from this template originates from Google. Simple.utm_medium=cpc: This is also hardcoded to tag the traffic as "cost-per-click," the standard identifier for paid search.&: The ampersand is just a divider, separating each UTM parameter from the next one.utm_campaign={campaignid}: This dynamically grabs the unique Campaign ID number from Google Ads. This is far better than using the campaign name, which people often change.utm_content={adgroupid}: Similarly, this pulls the unique Ad Group ID, letting you easily compare performance between different ad groups.utm_term={keyword}: This is the real magic. It captures the exact search term the user typed into Google that triggered your ad.
Expert Tip: Always use dynamic IDs like
{campaignid}and{adgroupid}instead of names. IDs are permanent. If you or someone on your team decides to rename a campaign later, your historical data stays perfectly intact and connected in your analytics. Using names can fragment your data, making long-term analysis a nightmare.
Why This Approach Is a Game-Changer
When you implement a universal tracking template, you automate the most error-prone part of digital marketing attribution. Say goodbye to typos, inconsistent naming conventions, and forgotten parameters. Every click is automatically tagged with the granular data you need, which flows straight into your analytics platform and CRM.
This method unlocks the deep insights required to make truly smart budget decisions. You'll finally be able to see exactly which campaigns, ad groups, and keywords are driving not just clicks, but actual, tangible revenue.
For a more detailed walkthrough on setup and other advanced options, check out our complete guide on the Google Ads tracking template. It’s the essential foundation for building a truly data-driven advertising strategy.
Creating UTM Naming Conventions That Work
While a tracking template handles the technical side of adding UTMs to your Google Ads, it won't save you from a very human problem: messy naming. Without a clear and consistent set of rules for how you name your campaigns, sources, and content, your analytics reports will quickly devolve into a fragmented, unusable nightmare.
This isn't just a minor pet peeve for data purists. A 2024 study from Northbeam found that inconsistent UTMs led to an average of 22% underreported ROI for marketing agencies. That’s a massive data gap that directly causes poor budget decisions. It often happens when someone renames a campaign midway through, splitting its performance data across two different names in analytics. You can dig deeper into how keyword planning findings are affected by historical data.
To avoid this reporting chaos, you need a documented playbook for your team to follow. Every single time.
The Ground Rules for Clean UTMs
Before you start building your naming structure, you need to establish a few non-negotiable rules. These simple habits prevent the most common errors that split your data in Google Analytics and other tools.
- Always use lowercase. UTMs are case-sensitive. That means
Googleandgooglewill register as two completely separate sources in your reports. Just enforce a "lowercase-only" rule from day one. - Use underscores or dashes, not spaces. A space in a URL gets encoded as
%20, which not only looks terrible but can occasionally break tracking. Always opt forspring_saleinstead ofspring sale. - Keep it simple and descriptive. Your campaign name should make sense to anyone on your team, even if they're looking at it six months from now. Something like
us_search_brand_q4_promois instantly understandable, whereascampaign_v2_finalis just confusing.
My personal rule of thumb is this: if a new team member can't understand the purpose of a campaign just by reading the UTM parameters, the naming convention has failed. Clarity is the ultimate goal.
A solid UTM naming convention is your first line of defense against messy analytics. It’s all about consistency. To help you stay on track, here’s a quick checklist of what to do and what to avoid.
UTM Naming Convention Dos And Don'ts
| Do | Don't |
|---|---|
| Use lowercase exclusively | Mix uppercase and lowercase letters |
Use underscores (_) or dashes (-) |
Use spaces, which become %20 |
| Be descriptive and clear | Use vague names like test_1 or promo_v2 |
| Keep it consistent across all channels | Create different naming rules for each platform |
| Document your naming convention for the team | Assume everyone knows the rules |
Following these simple guidelines will solve about 90% of the data fragmentation issues I see in client accounts. Consistency is the key to reliable, actionable reports.
A Practical Naming Convention Example
The secret to a good system is structure. Instead of letting people invent names on the fly, you need to create a formula. For the utm_campaign parameter, a fantastic structure often includes key business identifiers separated by underscores.
Here’s a common and highly effective formula:
[Targeting]_[Network]_[CampaignObjective]_[Identifier]
Let's see how this plays out in a real-world scenario for a branded search campaign targeting the United States.
Campaign Name:
us_search_brand_exactBreakdown:
us: Tells us the geo-targeting (United States).search: Specifies the ad network (Google Search).brand: Clarifies the campaign's goal (targeting branded keywords).exact: Notes the keyword match type in use.
This structured approach makes your analytics reports incredibly easy to filter and segment. You can instantly pull data for all US-based campaigns, all search campaigns, or all brand-focused efforts with just a few clicks. For more ideas on how to build out your own system, check out these essential UTM parameter best practices.
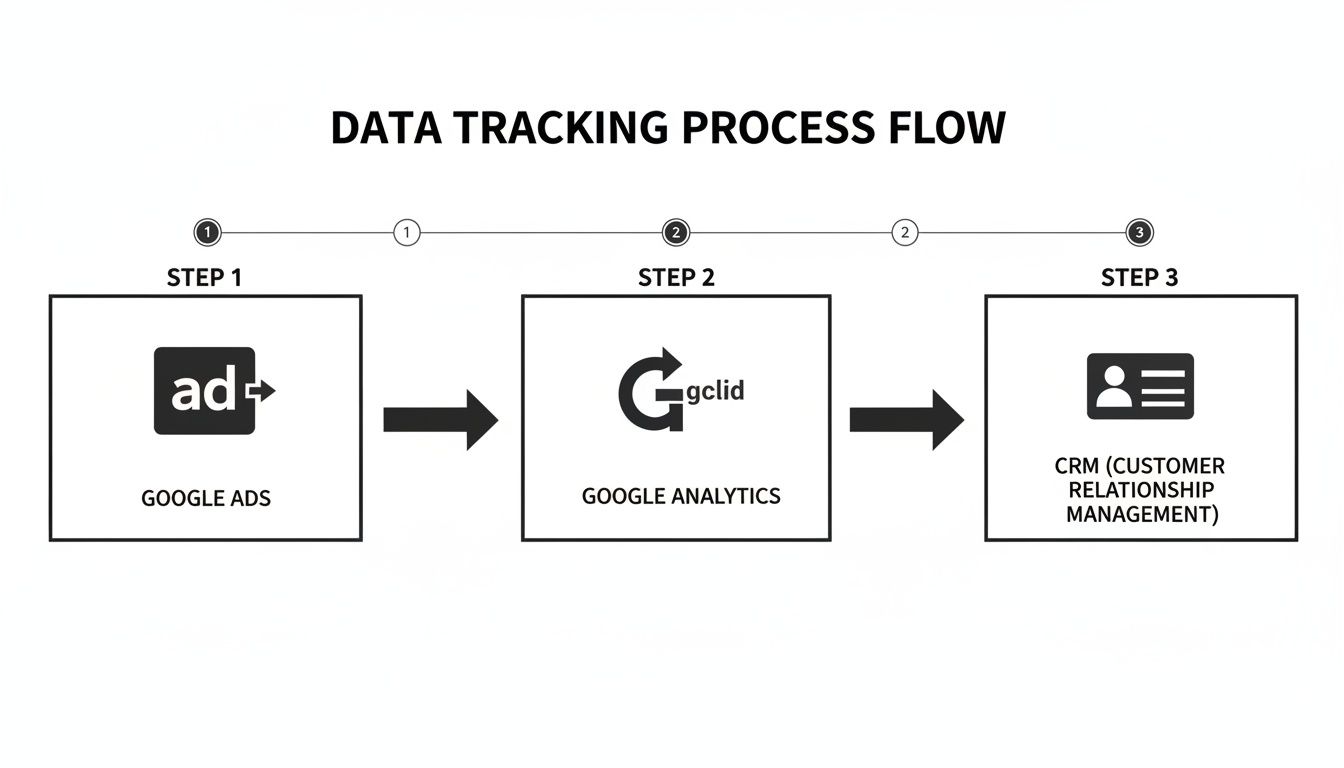
How Auto-Tagging and UTMs Play Nice Together
One of the most common questions I get from advertisers is about the relationship between Google's own auto-tagging (GCLID) and the manual Google Ads UTM parameters we've been building. Do you really need both? Does one cancel the other out?
It’s a great question, and the answer is surprisingly simple: Yes, you absolutely need both. They’re designed to work together, each handling a different, crucial job.
Think of it as two separate tracking systems running in parallel.
When you flip on auto-tagging in your Google Ads account, Google tacks on a unique identifier called a GCLID (Google Click Identifier) to your URLs. This GCLID is a special code that only Google products can really understand. Its main purpose is to create a direct, powerful link between your Google Ads account and Google Analytics, unlocking a ton of rich data you simply can’t get any other way.
The Power of GCLID for Google Analytics
With auto-tagging running, Google Analytics can pull in a whole layer of detailed performance metrics that manual UTMs just can't provide. This is the stuff you need to really optimize your campaigns with precision.
- Cost Data: See exactly what you’re spending on each campaign, ad group, and keyword.
- Ad Position: Find out how your ad's placement on the page is impacting its performance.
- Query Match Type: Figure out which match types (broad, phrase, or exact) are actually driving results.
- Shopping Campaign Details: Get super granular data on how individual products are performing.
Turn off auto-tagging, and all of this critical financial and performance context vanishes from your Google Analytics reports.
So, Why Do I Still Need UTMs?
If GCLID is so great, why are we bothering with a UTM tracking template at all? Here's the catch: the GCLID is basically gibberish to any tool outside of the Google universe.
Your CRM—whether it’s HubSpot, Salesforce, or Pipedrive—sees that long string of random characters (&gclid=Cj0KCQ...) and has no clue what to do with it. It can't figure out the source, medium, or campaign name from that code. This is where your carefully crafted UTMs step in to save the day.
The industry standard, and my strong recommendation, is to use both auto-tagging and a UTM tracking template at the same time. Google is smart enough to see both and will prioritize its own GCLID for populating Google Analytics reports, making sure you get that rich, integrated data. Meanwhile, your UTM parameters are passed right along with it, ready for your CRM and other tools to capture and make sense of.
This dual-tracking approach truly gives you the best of both worlds. You get the deep-dive data inside the Google ecosystem and the universally understood tracking data you need for all your other business platforms. It’s all about getting complete, end-to-end visibility without having to make any compromises.
Getting UTM Data Into Your CRM
So, you've got your UTMs firing perfectly from your Google Ads. That's a great start, but it's only half the battle. If that precious tracking data doesn't actually make it into your CRM alongside a new lead, it’s basically useless. This is the exact spot where most tracking setups break down, leaving marketers staring at a data gap.
Here’s the problem: UTM parameters don't automatically follow a user around your website. When someone clicks your ad, the UTMs are right there in the URL. But what happens when they click over to your "About Us" page, then browse a few services before finally landing on your "Contact" page to fill out a form? By that point, the original UTMs are long gone. The lead pops into your CRM, and you're left scratching your head as another expensive click gets mislabeled as "Direct."
This is how the data should flow, from the initial ad click all the way through to your CRM.
To make this ideal flow a reality, you need a way to catch the UTMs on that first landing page and hold onto them until the user is ready to convert.
Bridging the Gap With Hidden Form Fields
The classic, hands-on solution is to add hidden fields to your website's forms. It doesn't matter if you're using Gravity Forms, HubSpot Forms, or Typeform—you can add fields that visitors can't see but are there specifically to capture URL data.
This approach usually requires a bit of custom JavaScript that performs a few key actions:
- It scans the URL for UTM parameters the moment a visitor lands on your site.
- Next, it stores those parameters in the user's browser, typically using cookies.
- Finally, when the user is about to submit a form, the script automatically fills in the hidden fields with the stored UTM values.
While this method works, it does demand some technical skill to get right. You’ll either need to write a script yourself or find a reliable one online and then make sure it plays nicely with your form builder. For a more detailed look at the technical side of this, our guide on marketing lead tracking is a great resource.
The No-Code Alternative for Seamless Capture
For marketers who'd rather skip the custom code and the maintenance that comes with it, there's a much simpler way: dedicated attribution tools. A tool like Attributer, for instance, was built to solve this exact problem right out of the box.
It works by running a small script on your website that intelligently captures all marketing touchpoint data—including Google Ads UTM parameters—and saves it in a browser cookie. When a visitor submits a form, the tool automatically writes that data into the hidden fields you've added.
This "set it and forget it" approach means you can be confident that no matter how many pages a user clicks through before converting, the original source data will be reliably passed into your CRM. It completely closes the attribution loop, connecting your ad spend directly to the leads it generates without you ever having to touch a line of code. This ensures every lead is properly attributed, giving you clean, reliable data to make smarter marketing decisions.
Frequently Asked Questions
Even when you think you've got everything set up perfectly, some common questions always pop up around Google Ads UTMs. Let's tackle the ones I hear most often so you can get your tracking dialed in.
What Happens If I Use Both Auto-Tagging and a Manual Tracking Template?
This is actually the ideal setup, and they play together nicely. Google Ads prioritizes its own GCLID (from auto-tagging) for feeding data into Google Analytics. This is how you get all that rich, granular data like ad cost and click-through rates directly inside GA.
At the same time, the UTM parameters you built into your tracking template will be picked up by all your other tools—think your CRM, marketing automation software, or any third-party analytics platforms. They don't conflict at all. They work in parallel to give you the best of both worlds: deep Google integration and clear, universal tracking for everything else.
Can I Add UTM Parameters to Individual Ads Instead of Using a Template?
Technically, yes, you can stick UTMs in the "Final URL Suffix" on a specific ad. But I’d strongly advise against it. It's a management nightmare.
Think about it: manually updating UTMs across hundreds, or even thousands, of ads is not only a massive time sink, but it's also asking for mistakes. Typos happen, parameters get missed, and your data becomes a mess.
A tracking template at the account or campaign level is the way to go. It’s a “set it and forget it” approach that automatically applies your rules to every ad, ensuring your tracking is consistent and saving you a ton of headaches down the line.
How Can I Test If My Google Ads UTM Parameters Are Working Correctly?
The quickest sanity check is to just click on one of your own live ads. Once you land on your website, look at the URL in your browser's address bar. You should see all your UTM parameters—utm_source, utm_medium, etc.—and their values tagged onto the end of your landing page URL.
If you want to be 100% sure the whole system is working, take it a step further:
- Go through your funnel and submit a test lead on your website.
- Then, pop into your CRM or check your lead notification emails. The UTM data should be right there with the test lead's details. If it is, you've confirmed the tracking is solid from the initial click all the way to the conversion.
Why Is My UTM Term Parameter Showing {Keyword}?
Ah, the classic {keyword} problem. If you’re seeing the literal ValueTrack parameter in your reports instead of the actual search term, it usually points to a redirect issue stripping the parameters from your URL.
First, make sure you're definitely using a tracking template and not just adding parameters directly into the final URL field. The template is designed to handle this. If that's correct, the next culprit is often a redirect rule on your website or server that's wiping the URL clean before your tracking scripts have a chance to fire. Check with your web developer to see if any redirects are getting in the way.
Ready to stop losing attribution data and finally see where your leads are coming from? LeadPulse automatically captures Google Ads UTM parameters and passes them into your CRM, so you know exactly which campaigns are driving revenue. No code, no hassle—just clean, reliable data. Get started with LeadPulse today!
A Simple Guide to LinkedIn UTM Parameters
Tired of missing lead data? Learn how to use LinkedIn UTM parameters to track every lead from ads and posts directly into your CRM. A step-by-step guide.
A Simple Guide to Facebook UTM Parameters
Tired of guessing which ads work? This guide makes Facebook UTM parameters simple, helping you track every click and prove your marketing ROI without code.